

By Mike Richardson, Managing Director, Maximizer Software EMEA
Here’s a great bit of advice on the new features in our new Maximizer CRM Summer 2013, posted by our colleagues in Canada.
Customising your view of information in Maximizer is something I’ve talked about again and again. So it should probably come as no big surprise that one of the new features I’m most excited about in Maximizer CRM 12 Summer 2013 is designed to make it easier for your to do just that.
In my opinion, your CRM software is only as valuable as the information you can get out of it, so it is important to invest some time and thought in setting it up to give you exactly the information you need. In Maximizer, Key Fields lists are an important part of that puzzle, as they ensure that the most important fields for your entries are always readily accessible.
What do Key Fields do?
In case you’re not familiar with them, Key Fields lists are collections of basic and user-defined fields that are displayed in the main entry dialogs in Maximizer. They give you quick access to your most frequently-used fields without having to switch back and forth between tabs. They are especially useful in the new Address Book Details tab where, if you’ve set up your Key Fields correctly, you can access all of the Address Book data you need without ever having to open up the User-Defined Fields tab.
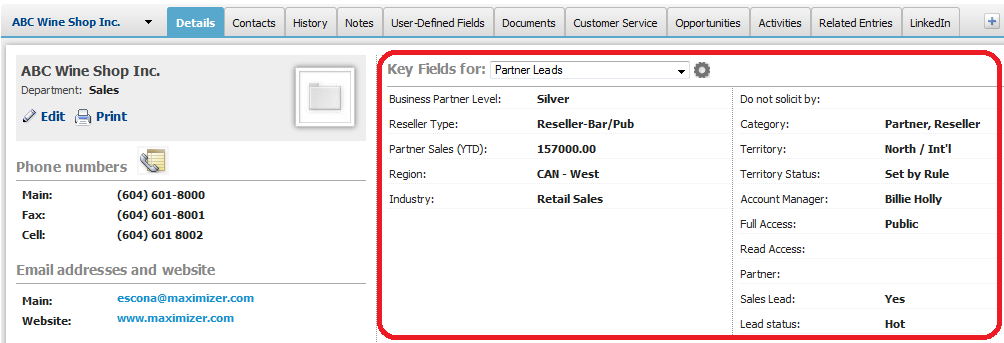
Your Key Fields lists allow you to view and edit user-defined fields right from the Details tab.
Key Fields Customization: then and now
In every previous version of Maximizer Web Access and Maximizer CRM Live, Key Fields could only be set up in the Administrator module. This made setting up and updating your Key Fields lists inconvenient, because it meant having to ask your system administrator anytime you wanted to make a change. It also placed an extra burden on your system administrator since they were responsible for maintaining the Key Fields lists for every single user in your organisation.
But with Maximizer CRM 12 Summer 2013, you can create and update your own Key Fields lists. Have you just created a new user-defined field for companies? You can add that field to your Key Fields lists right away. You no longer have to rely on somebody else to do it for you.
How Does it Work?
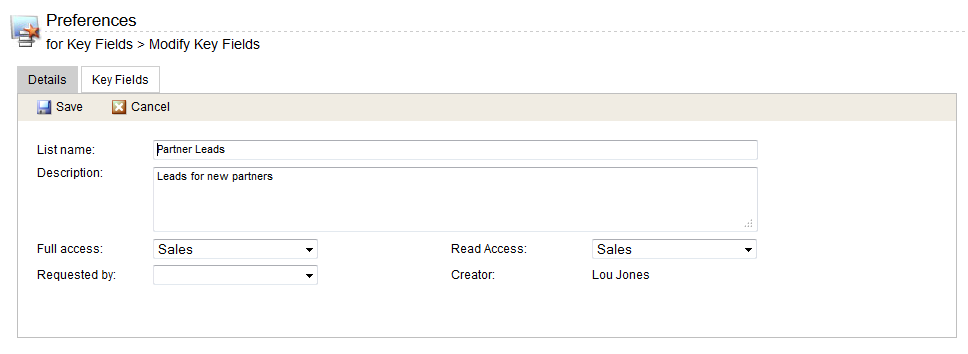
When you open the Address Book Details tab for the first time in Maximizer CRM 12 Summer 2013, you notice a new “gear” icon next to the Key Fields drop-down menu. Clicking the icon will pop-up a new window that gives you access to the Key Fields Preferences interface, where you can create and update your Key Fields Lists.
![]()
Clicking the “gear” icon next to the Key Fields drop-down in the Details tab will let you modify your Key Fields lists.
In the Key Fields List Details screen, you can specify a name and description, as well as the Full and Read Access settings for the Key Fields list. And in the Key Fields screen itself, you can add any field that you’d like to your Key Fields list, you can move fields around, and you can add separators to split up groups of fields.
It is also important to remember that for each Key Fields list, you can display different fields depending on the entry type that is selected. When setting up your Key Fields lists, you’ll want to make sure that you add all of the necessary fields to the list for each of the different entry types that you want to use the Key Fields list for.
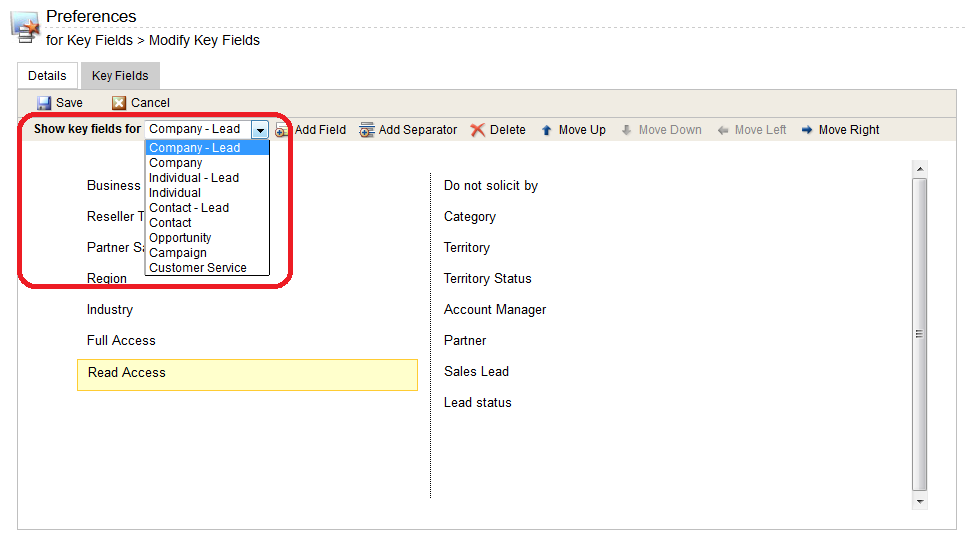
For each Key Fields list, you can specify different fields to be displayed depending on which type of entry you are viewing or editing.
Which Fields to include
In order to make the most of the Details tab for Address Book entries, I like to have every single user-defined field in my Address Book available in a Key Fields list. This way, I never have to open the User-Defined Fields tab at all, since all the fields I need are available right there in the Details tab.
Of course, if you have more than just a few user-defined fields in your Address Book, you’ll probably want to create a number of different Key Fields lists to group the fields in a logical way. But setting all that up will take time and might not be something you want to do all at once.
So, a good place to start when setting up your key fields is with mandatory user-defined fields. By making sure that any user-defined fields that are flagged as “mandatory” appear in one of your Key Fields lists, you can make it easier for yourself to set the required values when creating new entries.
Collaborate on the setup of Your Key Fields Lists
Having two-level security on Key Fields lists means that you can make your Key Fields lists available to your co-workers as well. If you’ve set up a Key Fields list that you think others in your organisation could benefit from, by changing the “Read Access” to “Public”, your Key Fields list will be available for everyone to use.
By changing the “Full Access” field to “Public”, any other user can modify the list as well. This way you can collaborate with your team to set up your Key Fields and everyone can benefit from each other’s changes. With everyone pitching-in to craft the ideal set of Key Fields, you’ll have them set up in no time and the burden won’t fall all on a single person anymore; your system administrator will thank you.